Esta es una de mis publicaciones viejas, escrita a finales del 2021.
DISCLAIMER: I do not condone illegally tampering with another person’s device. This guide was created with the intention of helping those who have acquired an old, used laptop that is only not perfectly functional because of this password. Also, I take NO RESPONSIBILITY for any harm done to your motherboard. It should go without saying that you should be careful when doing this.
BIOS-locked laptops are often sold incredibly cheap because your average layman thinks that they are bricked and worthless. In reality, removing the BIOS passwords is a piece of cake. This guide will only be covering the older method of removing BIOS passwords that does not work on more modern hardware. This guide is also written with Thinkpads in mind (the most modern Thinkpads this can be done being the **30 series machines, from 2012), but in theory this should work for other laptops as well.
Types of passwords
As far as I know, Thinkpads can have three kinds of passwords in their BIOS: the Hard Disk Password (HDP), the Power-On Password (POP) and the Supervisor Password (SVP). The HDP is rarely a problem since the old computer you bought probably didn’t even come with the hard-drive protected by that password. The POP is the easiest password to clear, and the SVP is the most common BIOS password found on Thinkpads. The reset method for the SVP can, in theory, be used as the end-all be-all to clear all passwords.
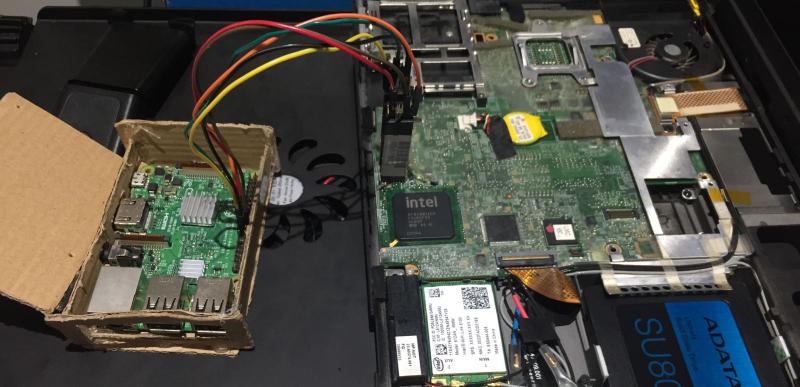
Finding the EEPROM
The EEPROM is the chip which needs to be tampered with in order to successfully reset the SVP. This chip can be found in all sorts of weird places across different kinds of motherboards. The X200, the machine I actually did this with, has the chip conveniently placed under the palm rest, meaning that unscrewing the keyboard and the palm rest is all you need to do to access it. For other Thinkpads though, it’s not nearly as easy or convenient. On the W series for example, it’s almost a complete disassembly. You also need to locate two particular pins on the EEPROM, namely the SCL and SDA pins. Here you can find the EEPROM and pin locations, as well as links to the hardware manuals to disassemble your machine. (Note that the website is for a piece of hardware you can buy to tinker with the EEPROM, but all we care about is the EEPROM’s location and pin layout.)
What we’re actually doing
The following is mere speculation on my behalf, as truth be told I’m not exactly sure why this works, I just know it does, but if you understand the EEPROM this way then you’ll be able to remove the password with no problem. What we’re going to do is short out the SCL and SDA pins shortly after booting. This will send the BIOS into an abnormal state in which it can’t properly read from or write to the motherboard, meaning it only loads the default, “passwordless” BIOS. The BIOS menu will remain in this abnormal state for as long as you keep the pins shorted, which is why once you’re promted to enter the new supervisor password, you must let go of the pins to successfully write the new password to the motherboard. (Actually, you may even be able to let go of the pins once you’re in the menu. For the sake of safety I just held the pins until I was prompted for the new password.) Keeping the pins shorted the entire time will not work. Trust me. I tried, many, many, many times.
The steps
Now that you know where the EEPROM is, how it works and where its SCL and SDA pins are, you can proceed to actually removing the password.
-
Unplug the laptop and disconnect the battery.
-
Disassemble the laptop and reach the EEPROM. Again, the EEPROM’s location (and thus how much you need to disassemble) depends on your Thinkpad model.
-
Plug the computer to power. If it didn’t already, turn it on. Make sure you have a screwdriver nearby though, because from here on out you’ll need to be quick.
-
As soon as the Thinkpad logo appears, short the pins and begin spamming F1 to get to the BIOS menu. You short the pins by making sure their metal is in contact with the metal tip of your screwdriver. If you successfully shorted the pins, then the computer should report various errors. They’re not always the same, but the many times I tried I remember seeing an error related to the CMOS time followed by a RAID or ES-something error and finally, the most important one, a security error. If you did not see these or you reach the BIOS in user mode (the one that requires and empty password and cannot change many items), then you must try again. Keep a steady hand and make sure the screwdriver is making contact with both pins.
-
Keeping the pins shorted, navigate to Security > Password > Supervisor Password. Hit Enter to receive the prompt to change it. I’m not sure if you need to keep the pins shorted for this long, you’re probably able to let go of them as soon as you reach the menu, but I held them up to this point so I can’t verify this.
-
Let go of the pins, then enter a blank password. That should disable the SVP. Hit F10 to save and exit.
-
Congratulations, the SVP is now disabled. But you’ll have to manually set the CMOS time if that reset itself, else you won’t be able to boot. You may also wish to change other values in the BIOS menu, like the Fn/Ctrl swap or the Thinkpad’s beeping.
P.S. Should I do this even if I want to install Libreboot?
If you find a Thinkpad with a locked BIOS and wish to install Libreboot, then you could technically skip this altogether. Libreboot will not have any problems overwriting the default BIOS. However, if you ever need the regular BIOS again, then even if you saved a copy it’ll still be locked. Also, the Libreboot documentation for the X200 and other Thinkpads recommends updating the EC firmware on your computer before flashing, since it can’t be done afterwards. All-in-all I’d say if you’re already going to open up the laptop to install Libreboot on it then this process is going to be easy enough for you and could save you from some future headaches.